Wednesday, February 22, 2006

Opinion: In Service of the Poem (Image)

I have an MFA, not in photography, but in poetry. In the MFA poetry program, we were taught that “what really happened” is not the first concern of the poem. The first concern of the poem is poetry, is image, surprise, discovery, beauty and truth. “What really happened,” Richard Hugo says, is the Triggering Town for the poem, the jumping off place for exploration and discovery.

I would like to suggest that in a sense, the same is true of photography. If photography is a fine art, and I believe it is or can be, then we have choices. We can do our best to portray what was there (documentary art), or we can make fine art. If the choice is to make fine art, it can still represent what we saw, but it doesn’t have to represent it as precisely as documentary art.

For example, if it was a dark drab dreary day, we can cheer it up, or make it even darker. We can isolate single flowers from a group or make a group where there was only one. We all know this, of course, using flood filters and buzz to make art from documents. I wanted to bring it up because I have noted some people preserving what was even when what could be might possibly be much better. Truth can be found, I believe, in art even if it differs somewhat from "reality."

Additionally, what is beautiful to the eye in person is not necessarily beautiful to the camera or to the eye of the viewer of the finished photo. The camera sees differently than the eye. It doesn’t edit, for one thing, the way the mind behind the eye behind the camera edits, removing sticks, spots, distracting detail and clutter, for example. And it inserts its own issues of exposure, unintentional camera movement, and so on. So we have to be extra vigilant to capture and reclaim our vision for the photo and not just record what was there. Unless we’re doing documentary photography, which is (can be) an art—a different, overlapping and equally challenging art.

When we SEE (truly see, envision) an image, before we take it, there is some element of magic that catches our eye, something that resonates. The object then is to capture that magic, the resonance and not simply what is there. It is hard for me, very hard, but I try not to let what is there stand in the way of and shadow the magc. Of course, I'm rarely successful at this, but it's my goal.
Tuesday, February 21, 2006

Privilege and Wisdom


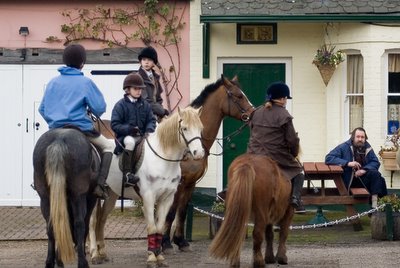
I am posting this one also just to show that I can but as the last one was posted at medium size I am now trying the large size.

Here again I did not think this shot was good enough to post on BP. I used poster edge on this and then went to Edit fade poster edge. I did this as I was not happy enough with the focusing.

Again the three girls are privileged and the man watching me is our village elder statesman (the chairman of our Parish Council). He is an alcoholic and totters off down to the pub regularly at 12.00 every day and then again at 6.30 pm. If his back is hurting him too much then he drinks red wine at home. He used to be some kind of big wig for the Post Office but alcohol was his downfall. He has a great sense of humour and a brilliant mind though he refuses to use the computer his daughters have given him. He used to write a very witty article for the local rag but he got banned from that when he likened the steak served in our local restaurant to shoe leather. So now he has started up his own publication called the Messinger. And who reads his scrawl and types it up and turns it into a newspaper and delivers it to 100 homes in the village? Yes, Geoff and I do!!

Privilege


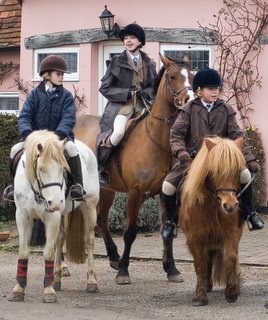
I am posting this just to show that I can post this.

The three girls are members of the pony club as I can tell from their ties which Sammy and Charlotte used to wear when they were members. They are such very privileged members of society to be able to own their own ponies and take part in the great activities of the pony club, especially their summer camps.

I used poster edge and then Edit fade poster edge. I did not think this picture good enough to post on BP because of the largest pony's head being partly blocked by the happy little girl on the Shetland. How on earth she managed to keep up with the hunt on that I cannot imagine. But I am sure she had a good time whatever.

Feel free to make any comments though only about post capture editing. There was so much going on. So many people getting in the way and horses moving around that it was just a question of luck as to the composition.

Thursday, February 16, 2006

Creaing a shape or heart mask in Photoshop


This image is by Jay Valle from his BP gallery.

Here are some instructions on how to create masks based on my trial and error. I don't know if there is an easier way, this works for me and I hope it does for you...

1) Open PS and click on new...any size will do for now.
2) Go to your paint bucket and make the white canvas any color, with the apple I left it white.
3) Now in the tool pallet go to the shapes feature located just below the "T", there at the very bottom you'll find the custom shapes tool.
4) As soon as you click on that you'll see a choice menu above.
5) Drop down that shapes menu and you'll see a bunch of little cool shapes to play with.
6) Click on the heart and the color black in the color box to the right.
7) Bring your curser back to your canvas, click the left mouse bottom as you drag it to create your heart shape. You can adjust its size and position by then clicking the Free Transform Path under the edit menu.
8) Now when that's all done go to the layers menu and click on flatten Image.
9) Now that the image is all one piece, click the eraser tool and get the Magic Eraser Tool.
10) Bring that tool to the canvas and put it into the heart then left click the mouse. BINGO! If all went well then you'll see a transparent heart (shown by checkerboard in heart), and your mask is created.
11) Almost done Mary, stay with me now...Go to the top of the tool pallet and click on the rectangular Marquee Tool.
12) Left click keeping finger on mouse button and glide it over the entire canvas from left upper corner to lower right corner, then release, you'll see the dotted wiggle lines around the entire canvas.
13) Now under the Edit menu click Cut. And close the screen. You'll get asked if you want to save? You can or just say no.
14) Now for the final touch....open any picture in Photoshop.
15) Now in the Edit menu click paste.

Okay, there is your mask over your photo. Note: You can adjust the size of the mask by clicking transform under the Edit menu. When all is positioned and colored the way you want it, don't forget to flatten your images to make it one.
I hope this helps, let me know how you made out.

This tutorial was sent to me by BP member Jay Valle. Here is the link to his BP gallery.